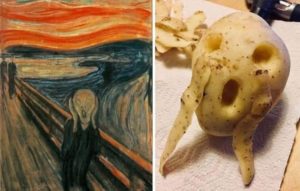
Como sabréis, durante el confinamiento la gente ha mostrado una creatividad desbordante en las redes sociales, y uno de los retos estrella, desde mi punto de vista, ha sido la recreación de una obra de arte con objetos cotidianos. Se ha representado El grito de Munch con una patata, o La Joven de la Perla con un gato.
En fin, la imaginación no tiene límites y el resultado ha sido muy divertido.
En Classroom os adjunto una presentación con varios ejemplos, muchos de ellos ya los habréis visto.
También os adjunto enlaces a algunos de los museos más importantes del mundo, para que encontréis vuestro cuadro preferido para recrearlo, puede ser desde un paisaje, bodegón, retrato, puede ser incluso un cuadro abstracto y de cualquier época.
Espero que disfrutéis haciéndolo.
We are going to fill the fourth table with a monochromatic range, this means that we are going to play with the darkness and luminosity of a color.
Choose a color among the primaries; yellow, magenta, or blue; or between the secondary ones; green, purple or red.
And now start watching this tutorial:
This is the artistic application of the monochrome range:
HOW TO CREATE A SENSATION OF DEPTH
We are going to choose a color, and we are going to make a monochrome range.
For them we are going to paint the middle box with the pure color, for example blue, from left to right we are going to press the pencil less and less until we reach white. This strip of colors is brighter than the other.
From right to left we are going to press the pencil more and more and we are going to mix it with pencil 2b, to darken it even more. With this strip of colors we are playing with color saturation, the more mixed the color the less saturation it will have. If the color is purer, it is more saturated and if it is more mixed it will be less saturated.
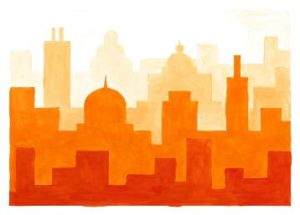
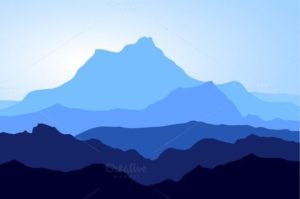
We can apply the monochrome color table to create a feeling of depth, for example in a landscape with mountains located at different distances.
If we replace the mountains by buildings we get an urban landscape.
If you look, the mountains or the buildings the further away they are the more brightness or luminosity they have and the closer they are the less saturated they are, so we will have to mix them with black.
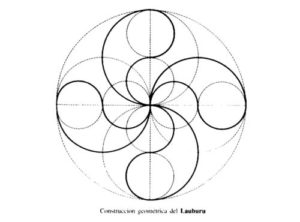
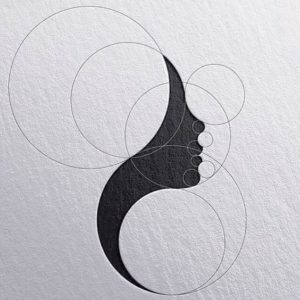
Links are part of our life. When two geometric figures are tangent, they have continuity with each other. Which generates smooth shapes and without sudden changes.
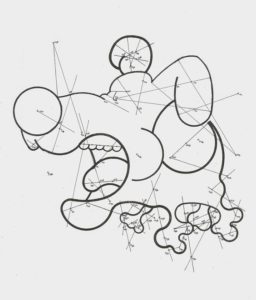
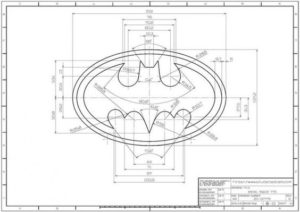
In the design world they are used frequently:
I want you to see these tutorials in this order, they are examples of what you will do later in your sketchbook with other information:
0.Tangencies explanation and rules:
1. First example: Straight line tangent to a circumference:
2. Second example: Two tangent lines to a circumference from an exteranl point P:
3. Third example: External tangent circumference to another circumference:
4. Fourth example: Internal tangent circumference to another circumference:
5. Fifth example: Tangent circumferences to another two circumferences:
We are going to do these exercises in two weeks:
First week:
nº1: Draw a tangent line to a circumference whose radius measures 4 cm using your compass. Free tangency point.
nº2: Draw two tangent lines to a circumference whose radius measures 3 cm from an external P point. Free P point.
Second week:
nº3: Draw an external tangent circumference whose radius measures 2’5 cm to another circumference whose radius measures 4 cm. Free tangency point.
nº4: Draw an internal tangent circumference whose radius measures 2’5 cm to another circumference whose radius measures 4 cm. Free tangency point.
nº5: Draw two tangent circumferences whose radius measure 3’5 cm, to another two circumferences whose radius measure 4 and 3cm respectively and the distance between their centers is 9 cm.
CUANDO HABLAMOS DE EFECTOS DE VÍDEO NOS REFERIMOS A LOS EFECTOS ESPECIALES, si pincháis en el enlace de abajo os llevará a los contenidos que ya hemos visto con anterioridad sobre los efectos especiales como los cromas, maquetas, etc.
Durante el confinamiento han surgido algunos retos virales como el de hacer un stop motion creando la sensación de que te desplazas por la casa o bien arrastrándote o volando.
Aquí puedes ver un ejemplo de este reto:
Hay otros vídeos de gente volando en una escoba que vienen a ser lo mismo:
O este otro del músico y artista plástico Raphael Decoster:
O los originales videos musicales de OK GO:
En este vídeo de Pinterest podéis ver muchos trucos curiosos, entre ellos algunos stopmotion.
Para esta actividad os propongo que hagáis vuestro propio stop motion similar a los que hemos visto en los ejemplos. Puedes hacer alguna actividad de casa, dado que no podemos salir estos días, sin tocar el suelo, o deslizarte por la casa sin mover las piernas, o reptar por el suelo. Lo que se te ocurra. Seguro que pasas un buen rato haciéndolo.
Si tenéis TIK TOK podéis participar en el reto o buscar más información con #flychallenge
CÓMO HACERLO:
En este enlace veréis un tutorial de cómo hacer girar un objeto en stop motion, tan solo tenéis que sustituir el objeto por una persona y ya lo tenéis. Podéis hacer la prueba haciendo un pequeño giro y a partir de ahí ya podéis hacer lo que queráis.
Si queréis crear la sensación de que voláis tenéis que dar un salto y doblar las rodillas, y alguien os tiene que hacer la foto con la aplicación Stop motion y pillaros en el aire, y así desplazaros dando saltitos; o bien hacer las fotos vosotros y que salte otra persona. Lo normal en este caso es que se vea la estela que dejan vuestros pies al moverse en el salto. Si lo hacéis según se explica en este tutorial no se vería, pero desde mi punto de vista es más complejo, pero lo dejo a vuestra elección.
Yo realicé un stopmotion con mi hija, para que veáis un ejemplo de lo que pido. En este vÍdeo, da un giro y se desplaza sin mover los pies, pero el movimiento que hagáis es libre, podéis hacer que vaya cambiando la ropa de color (si os vais cambiando la camiseta, por ejemplo) mientras camináis, o que os cambie el peinado, o que voléis, eso depende de vuestros gustos e imaginación.
INSTRUCCIONES TÉCNICAS:
Estas instrucciones son concretamente por si queréis crear la sensación del vuelo, pero las podéis extrapolar a cualquier movimiento que queráis realizar:
Tenéis que usar la app stopmotion en la que crearéis un proyecto
Si queréis crear la sensación de que voláis tenéis que dar un salto y doblar las rodillas, y hacer la foto cuando estáis con los pies en el aire. Tened en cuenta que no se pueden importar fotos de vuestra galería en la versión gratuita de esta app, por lo que tendréis que hacer las fotos desde la propia app. Si sale mal porque no os pilla en el aire, borradla y repetidla. Lo ideal es poder pedirle a un familiar que os ayude. Cuando tengáis clara la idea y la escena, la parte de hacer las fotos que necesita ayuda no os debe llevar más de 10 minutos. Esto se puede hacer de varias formas:
1. Si os puede ayudar alguien, vosotros saltáis y os hace la foto esa persona desde la app. (Opción más fácil)
2. Si os puede ayudar alguien, y preferís no salir vosotros, sois vosotros los que fotografiáis a esa persona mientras salta. (Opción más fácil)
3. Si estáis solos, podéis dejar el móvil colocado en un sitio y usar el temporizador que lleva la app. Vosotros le ponéis el temporizador a la cámara y saltáis. (Opción más difícil)
4. Si estáis solos, os podéis grabar un vídeo saltando desde la cámara de vuestro móvil, sin usar la app, y de ese vídeo hacéis una captura de pantalla de la parte en la que estáis saltando. Como la app de stopmotion no permite importar imágenes de vuestra galería en la versión gratuita, tendréis que juntar las fotos con un programa de edición de vídeo. (Opción más difícil).
La app junta las imágenes en las que estáis en el aire, y crea la sensación de vuelo. Desde el menú de fuera, donde están los proyectos, seleccionáis el proyecto que habéis creado, le dais a compartir y os permite descargarlo en vídeo.
Con un programa de edición de vídeo, hay que ponerle título en el vídeo, vuestro nombre, y ponerle música. Si la música tiene derechos de autor, tenéis que poner el autor de la canción. (Las apps más comunes son filmora go, que es gratis, videostar, pero hay muchas más, utiliza aquella con la que te sientas más cómod@. En este enlace tienes algunas de ellas: https://www.cice.es/noticia/7-mejores-aplicaciones-de-edicion-video-gratuitas/)
Se valorará la originalidad del vídeo y de la acción realizada
1. Triangles 1: Contruction of a triangle knowing 2 sides and one angle
2. Triangles 2: Contruction of a triangle knowing 2 angles and one side
3. Triangles 3: Contruction of a triangle knowing 3 sides
You have to do these 3 activities: 1. Draw one triangle knowing 2 sides and one angle: AB=8cm; AC=6,5cm and A=30º 2. Draw one triangle knowing 2 angles and one side: AB=7cm; A=30º and B=60º 3. Draw one triangle knowing 3 sides and one angle: AB=7,5cm; AC=4cm and BC=7cm
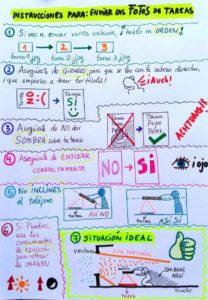
Finally take a picture of the page and send it to me. Please, take a look to the instruction and take a photo just of the sheet.
LA BIEN QUERIDA is my musical recommendation for today.
To do this exercise I offer you two options:
1. A drawing using the silhouette of your hands.
2. A drawing using a symmetrical figure cut out of cardboard as a silhouette.
You can use all the colored pencils you have but divide them between warm and cold colors. If you don’t have many colors you can mix them to get more shades.
This is my musical recommendation of the week, Jarabe de Palo.
We are going to complete the 2nd and the 3rd table that we made two weeks ago, the 1st one has the gray scale.
In the 2nd table we are going to make a range of warm colors.
In the 3rd table a range of cool colors.
You can only use your colored pencils and the 3 primary colors, yellow, magenta ( REMEMBER THAT IF YOU DON’T HAVE THIS COLOR YOU CAN USE RED) and cyan blue.
You have to see the tutorials in this order:
1. Warm range
2. Cold range
There are also two documents with more information about colors that we’ll see in the online class.
Finally, take a picture to your exercise and send it to me.
This is my musical recommendation for this week, is Pedropiedra I hope you enjoy it.
Buenos días, para esta semana, revisar esta presentación sobre la narrativa audiovisual, donde podréis ver los distintos tipos de planos, angulaciones y movimientos de cámara, os vendrá muy bien para completar la actividad que he subido en el Classroom de Edpuzzel.
Os recuerdo que Edpuzzel es una aplicación para visionar vídeos interactivos, el vídeo se para y tienes que contestar a una pregunta para poder seguir viéndolo.
Tenéis de plazo hasta las 23:00 del jueves 30 de abril para completar esta actividad.
Good morning everyone,
We continue with the Thales Theorem.
Last year we did a very nice job applying it to making your name. We are going to do a brief review and we are going to apply it to the construction of regular polygons.
The order you have to follow to watch the videos is as follows:
1. Thales Theorem
2. Doing a margin on the sheet (opcional)
3. Second task : Divide a segment
4. General Method
Finally take a picture to your sheet and send it to me.
This is my musical recomendation for today:
This website uses cookies and asks your personal data to enhance your browsing experience. We are committed to protecting your privacy and ensuring your data is handled in compliance with the General Data Protection Regulation (GDPR).